Programming, Data Structures And Algorithms Using Python

Week 8 Programming Assignment


Domino Solitaire

(Indian National Olympiad in Informatics, 2008)
In Domino Solitaire, you have a grid with two rows and many columns. Each square in the grid contains an integer. You are given a supply of rectangular 2 × 1 tiles, each of which exactly covers two adjacent squares of the grid. You have to place tiles to cover all the squares in the grid such that each tile covers two squares and no pair of tiles overlap.
The score for a tile is the difference between the bigger and the smaller number that are covered by the tile. The aim of the game is to maximize the sum of the scores of all the tiles.
Here is an example of a grid, along with two different tilings and their scores.

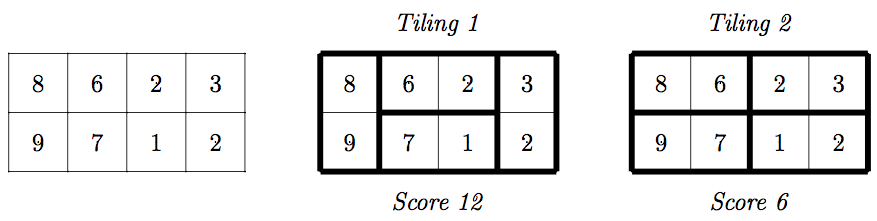
The score for Tiling 1 is 12 = (9−8)+(6−2)+(7−1)+(3−2) while the score for Tiling 2 is 6 = (8−6)+(9−7)+(3−2)+(2−1). There are other tilings possible for this grid, but you can check that Tiling 1 has the maximum score among all tilings.
Your task is to read the grid of numbers and compute the maximum score that can be achieved by any tiling of the grid.

Solution hint

Recursively find the best tiling, from left to right. You can start the tiling with one vertical tile or two horizontal tiles. Use dynamic programming to evaluate the recursive expression efficiently.

Input format

The first line contains one integer N, the number of columns in the grid. This is followed by 2 lines describing the grid. Each of these lines consists of N integers, separated by blanks.

Output format

A single integer indicating the maximum score that can be achieved by any tiling of the given grid.

Test Data:

For all inputs, 1 ≤ N ≤ 105. Each integer in the grid is in the range {0,1,...,104}.

Sample Input:

4
8 6 2 3
9 7 1 2

Sample Output:

12

Ans:

n=int(input())
arr=list(map(int,input().split()))
arr_2=list(map(int,input().split()))
prev_state=0
final=abs(arr[0]-arr_2[0])
for i in range(1,n):
  vertical_place=final+abs(arr[i]-arr_2[i])
  horizontal_place=prev_state+abs(arr[i]-arr[i-1])+abs(arr_2[i]-arr_2[i-1])
  prev_state=final
  final=max(vertical_place,horizontal_place)
print(final)                                                

netaji gandi Friday, September 27, 2019
UNIX LAB EXPERIMENT NO :11 Configuring RAID

  1. Configuring RAID
RAID Mirroring means an exact clone (or mirror) of the same data writing to two drives. A minimum two number of disks are more required in an array to create RAID1 and it’s useful only, when read performance or reliability is more precise than the data storage capacity.Create Raid1 in Linux
Mirrors are created to protect against data loss due to disk failure. Each disk in a mirror involves an exact copy of the data. When one disk fails, the same data can be retrieved from other functioning disk. However, the failed drive can be replaced from the running computer without any user interruption.

Features of RAID 1

  1. Mirror has Good Performance.
  2. 50% of space will be lost. Means if we have two disk with 500GB size total, it will be 1TB but in Mirroring it will only show us 500GB.
  3. No data loss in Mirroring if one disk fails, because we have the same content in both disks.
  4. Reading will be good than writing data to drive.

Requirements

Minimum Two number of disks are allowed to create RAID 1, but you can add more disks by using twice as 2, 4, 6, 8. To add more disks, your system must have a RAID physical adapter (hardware card).
Here we’re using software raid not a Hardware raid, if your system has an inbuilt physical hardware raid card you can access it from it’s utility UI or using Ctrl+I key.
My Server Setup
Operating System : CentOS 6.5 Final
IP Address  : 192.168.0.226
Hostname  : rd1.tecmintlocal.com
Disk 1 [20GB]  : /dev/sdb
Disk 2 [20GB]  : /dev/sdc
This article will guide you through a step-by-step instructions on how to setup a software RAID 1 or Mirror using mdadm(creates and manages raid) on Linux Platform. Although the same instructions also works on other Linux distributions such as RedHat, CentOS, Fedora, etc.

Step 1: Installing Prerequisites and Examine Drives

1. As I said above, we’re using mdadm utility for creating and managing RAID in Linux. So, let’s install the mdadm software package on Linux using yum or apt-get package manager tool.
# yum install mdadm  [on RedHat systems]
# apt-get install mdadm  [on Debain systems]
2. Once ‘mdadm‘ package has been installed, we need to examine our disk drives whether there is already any raid configured using the following command.
# mdadm -E /dev/sd[b-c]

Step 2: Drive Partitioning for RAID

# fdisk /dev/sdb
Follow the below instructions
  1. Press ‘n‘ for creating new partition.
  2. Then choose ‘P‘ for Primary partition.
  3. Next select the partition number as 1.
  4. Give the default full size by just pressing two times Enter key.
  5. Next press ‘p‘ to print the defined partition.
  6. Press ‘L‘ to list all available types.
  7. Type ‘t‘to choose the partitions.
  8. Choose ‘fd‘ for Linux raid auto and press Enter to apply.
  9. Then again use ‘p‘ to print the changes what we have made.
  10. Use ‘w‘ to write the changes.
# fdisk /dev/sdc
# mdadm -E /dev/sd[b-c]

Step 3: Creating RAID1 Devices

# mdadm --create /dev/md0 --level=mirror --raid-devices=2 /dev/sd[b-c]1
# cat /proc/mdstat
# mdadm -E /dev/sd[b-c]1
# mdadm --detail /dev/md0

Step 4: Creating File System on RAID Device

# mkfs.ext4 /dev/md0
# mkdir /mnt/raid1
# mount /dev/md0 /mnt/raid1/
# touch /mnt/raid1/tecmint.txt
# echo "tecmint raid setups" > /mnt/raid1/tecmint.txt
/dev/md0     /mnt/raid1              ext4    defaults        0 0
# mount -av
# mdadm --detail --scan --verbose >> /etc/mdadm.conf

Step 5: Verify Data After Disk Failure

# mdadm --detail /dev/md0
# ls -l /dev | grep sd
# mdadm --detail /dev/md0
# cd /mnt/raid1/
# cat tecmint.txt
Verify RAID Data
yum install mdadm [on RedHat systems]
# apt-get install mdadm [on Debain systems]

netaji gandi Monday, September 23, 2019

NPTEL Programming in Java Jan 2024 Week 11

  Week 11 : Programming Assignment 1 Due on 2024-04-11, 23:59 IST The following code is missing some information needed to run the code. Add...